Easy decorate halloween biscuits: 5 Spook-tacular Ideas for Fun Baking!
Ready to decorate halloween biscuits? Learn amazing techniques and creative cookie designs to make spooky treats everyone will love. Get started today!

- Are You Ready for a Spook-tacular Baking Adventure?
- Historical Background of Spook-tacular Biscuits
- The Complete Guide to Authentic Spook-tacular Decorated Halloween Biscuits
- The Magic Behind This Recipe
- Health and Nutrition Highlights
- Recipe at a Glance
- Master Ingredient List
- Kitchen Equipment Essentials
- Spook-tacular Decorated Halloween Biscuits
- Professional Secrets
- Perfect Presentation
- Storage and Make-Ahead
- Creative Variations
- Complete Nutrition Guide
- Expert FAQ Solutions
- Recipe Card
Are You Ready for a Spook-tacular Baking Adventure?
Picture this: the leaves are turning, halloween decorations are creeping onto doorsteps, and there’s a chill in the air that whispers of candy corn and costume parties.
So, are you ready to decorate halloween biscuits that will wow your friends and family? honestly, once you get your hands on this recipe, you’ll be itching to whip up some spooky biscuit ideas that might just steal the show at your next holiday gathering!
What makes these treats extraordinary is not just their deliciously sweet vanilla flavor or their eye-catching designs, but the sheer joy of creating them.
The time commitment? just around an hour and change, so it easily fits into a busy afternoon. as for difficulty? i'd say it's medium .
You don’t have to be a pro baker—just a touch of creativity and patience will make your biscuits shine! trust me; the process is almost as fun as the finished product.
Historical Background of Spook-tacular Biscuits
Baking, a tradition woven through centuries of human experience, has given rise to countless delightful creations. In medieval England, for instance, bakers were skilled artisans of their trade, crafting sweet and savory delights long before pumpkin spice was even a thing—imagine how they’d react to our present-day holiday baking recipes !
Fast forward to today, and decorated biscuits have taken over festive occasions, especially halloween, as families create fun halloween treats to bond over.
These beautifully iced creations reflect cultural significance and childhood joy, making them the perfect canvas for decorative flair that can brighten up any halloween dessert table .
The Complete Guide to Authentic Spook-tacular Decorated Halloween Biscuits
These biscuits have a rich culinary heritage that gets the creative juices flowing. their origin story is as enchanting as any tale, bubbling with the spirit of gatherings where laughter and shared treats unite us.
Nowadays, they’re a staple at holiday potlucks and halloween parties, bringing with them a festival of flavors and colors that get everyone in the festive spirit.
The Magic Behind This Recipe
What truly sets these biscuits apart is their unique flavor combinations and delightful textures. the bases are lightly sweetened, perfectly complementing the vivid icings you’ll learn to craft with expert-tested techniques.
There’s a certain charm in rolling out the dough, cutting it into scary cookie shapes , and later transforming those little doughy canvases into eye-catching decorations that could make even the sternest halloween grump crack a smile.
You’ll appreciate the foolproof methods that will guide you through piping with royal icing. Plus, I’ve thrown in some time-saving tips that will ensure you spend less time worrying about perfecting your décor and more time enjoying them with your friends and family!
Health and Nutrition Highlights
Let's not forget to talk about the health aspect—who doesn't love a guilt-free treat? while these biscuits are a sweet indulgence , they can be part of a balanced approach to wellness when enjoyed in moderation.
They contain wholesome ingredients that can easily be tailored to accommodate various dietary needs—yes, even gluten-free biscuit recipes ! just pair them with some fruit or nuts to round out your health goals.
Recipe at a Glance
So, here’s the rundown before we dive into the ingredients—this baking adventure takes about 1 hour and 10-12 minutes from start to finish and yields around 24 biscuits .
It does have a bit of intricacy, but that just means more halloween baking fun , right? when you're planning your next bake-off or just want to impress your buddies at the upcoming halloween party, the cost efficiency of these biscuits will be a welcome surprise!
Now that you’re buzzing with excitement, let’s get ready to craft some magical spooky biscuit creations ! grab your mixing bowls and preheat your oven, because it’s time to gather your ingredients and start crafting your unique halloween desserts.
After all, what’s the fun of halloween if you can’t decorate some biscuits to match the spirit of the season?
Stay tuned as we move into the next chapter of our baking adventure: the ingredients section where we’ll explore everything you need to create your decorated sugar cookies .
Trust me; you won’t want to miss it!
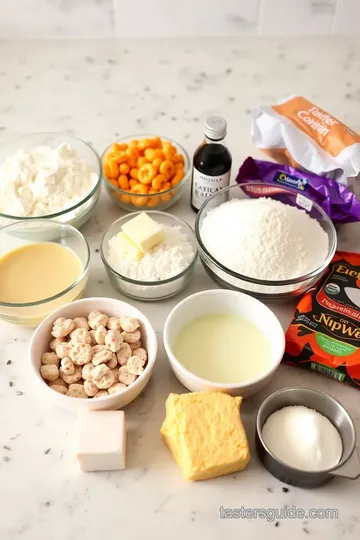
Master Ingredient List
Oh my gosh, let’s dive into the magical realm of baking! it’s like stepping into a world where flour becomes art and sugar transforms into pure joy.
And in today’s adventure, we’re whipping up the most spook-tacular decorated halloween biscuits ! these delightful treats are perfect for sharing, and i guarantee they'll make you the hit of any halloween gathering.
Premium Core Ingredients
First things first, you gotta gather your premium core ingredients. Here’s what you’ll need:
- 2 ½ cups (312 g) of all-purpose flour - Look for a good quality brand; it makes all the difference.
- ½ teaspoon baking powder - This little guy helps your biscuits rise like the ghosts on a chilly October night.
- ½ teaspoon salt - A little pinch goes a long way in balancing flavors.
- 1 cup (225 g) unsalted butter, softened - When it’s at room temp, it encourages that lovely, creamy texture.
- 1 cup (200 g) granulated sugar - Use a high-quality sugar to keep everything sweet and simple.
- 1 large egg - It’s the glue that holds your biscuit family together!
- 2 teaspoons vanilla extract - Oh, the aroma! Grab a good quality one for the best flavor.
Signature Seasoning Blend
Next up, let's talk about that glorious royal icing that'll take your spooky biscuit ideas to the next level.
- For Royal Icing:
- 3 cups (360 g) powdered sugar - It’s a must for that sweet, smooth finish.
- 2 tablespoons meringue powder - This is like the potion that makes it all hold together. If you’re low on this, egg whites can be a good alternative.
- 6 tablespoons water - But adjust this based on how thick or runny you want your icing!
- Food coloring - You know you want vibrant blacks, oranges, purples, or whatever your Halloween spirit desires!
Smart Substitutions
Sometimes you may not have every ingredient on hand, and that’s totally fine! Let’s chat about some clever substitutes:
- If you’re out of meringue powder for the icing, just swap it with some egg whites. Just don’t forget to whip them like you're channeling your inner Mary Berry !
- For gluten-free biscuit recipes, a good gluten-free flour blend will do wonders. Just make sure to check those labels!
- Seasonal variations can spice things up too! Think about adding pumpkin spice to the biscuit dough or using peppermint for some winter fun.
Kitchen Equipment Essentials
And don’t forget the tools! Here’s a quick rundown of must-have kitchen essentials:
- Mixing bowls - Get a few sizes; you'll thank yourself later.
- Electric mixer - Save your arms; trust me!
- Rolling pin - To roll out that beautiful biscuit dough.
- Cookie cutters - Halloween-themed of course! The spookier, the better!
- Baking sheets - A good non-stick surface, or you can always line it with parchment paper to prevent stickage.
- Piping bags or plastic zip bags - For icing decor.
Pro Ingredient Tips
Alright, the real-deal secrets here. To ensure those cookies are the stars of the holiday dessert table:
- Check your butter : It should be soft and at room temp for the best texture.
- Quality markers : Choose ingredients that state "pure" on the labels for flavors like vanilla or almond—you want the good stuff.
- Store properly : Keep your flour and sugar in airtight containers to maintain freshness, prolonging that baking thrill.
- Money-saving tip : Buy in bulk when possible. Things like flour or sugar last forever, so why not save a few coins?
Seriously, preparing your ingredients is half of the fun! Soon, you’ll be ready to embark on the delightful process of crafting your own decorated Halloween biscuits !
Can’t you just imagine them: a dazzling array of scary cookie shapes lined up on a spooky platter, all waiting for that final touch of icing magic? before we jump into the instructions on how to make these delectable treats, think about all the opportunities to experiment to create some truly unique halloween desserts .
Buckle up, my friend, because we’re about to make some edible halloween decorations!
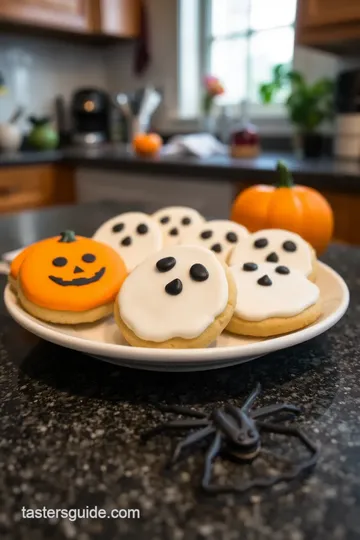
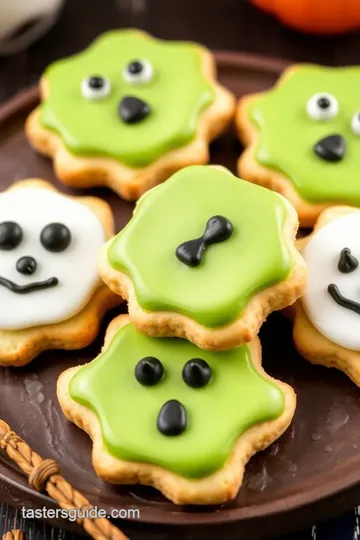
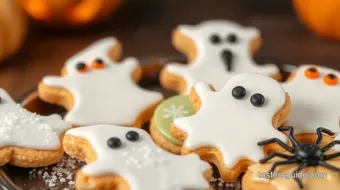
Spook-tacular Decorated Halloween Biscuits
Oh my gosh, halloween is just around the corner, and you know what that means? time for some spook-tacular decorated halloween biscuits ! i can literally smell the cinnamon in the air.
Honestly, there’s something about this season that just makes baking feel extra special. so grab your apron, and let’s bake up some fun!
Essential Preparation Steps
Before diving in, let’s chat about mise en place . It means getting all your ingredients ready before you start, and trust me, it makes life so much easier! For this recipe, you'll need:
- 2 ½ cups all-purpose flour
- ½ teaspoon baking powder
- ½ teaspoon salt
- 1 cup unsalted butter (softened)
- 1 cup granulated sugar
- 1 large egg
- 2 teaspoons vanilla extract
For decorating, don’t forget your royal icing ingredients and, of course, those cute cookie cutters in spooky shapes!
Prep techniques? it’s pretty straightforward. just whisk together your dry ingredients in one bowl and cream the butter and sugar in another.
Make sure to get that butter nice and fluffy—this will help your biscuits taste amazing.
For time management, plan to spend about 20 minutes prepping, followed by 30 minutes chilling. the chilling part is crucial to keep those biscuits from spreading too much in the oven.
Think of it as a spa day for dough.
And for organization, lay out your baking sheets and have everything pre-measured. It'll prevent you from scrambling around like a headless chicken halfway through!
Professional Cooking Method
Alright, let’s get down to the nitty-gritty step-by-step process. first, preheat your oven to 350°f (175°c). while that's heating up, grab your chilled dough and roll it out to about ¼-inch thick on a floured surface.
I love using themed cookie cutters for this—it’s so festive!
Bake those biscuits for 10-12 minutes until the edges are just slightly golden. you don’t want to overdo it or they’ll get hard.
Let them cool on a wire rack before you even think about frosting them because we’re going for a perfectly decorated sugar cookie .
Oh, and let's not forget about timing! keep an eye on them; when they puff up and the edges just start to brown, it's time to pull them out.
That’s your success indicator right there.
Expert Techniques
Now for those professional methods that give you bragging rights. When making the royal icing, combine powdered sugar, meringue powder, and water until it’s silky smooth—think flood and outline techniques .
To decorate, use piping bags (or just zip bags with a corner snipped off if you’re in a pinch) and go wild! i like to outline the shapes first and then flood them with icing.
This prevents the icing from running off the edges.
Remember to pay attention to your icing consistency; you want it thicker for outlines and a bit thinner for flooding. It’s all about precision points—too runny, and it’ll become a puddle!
Success Strategies
Okay, what if things go south during your baking adventure? no worries! if your icing turns out too thick, just add a wee bit more water.
For dough that’s sticky, sprinkle a little flour while you roll it out.
Always do touch-ups after the first layer of icing dries, adding extra details or sprinkles as you go. It really amps up those creative cookie designs .
And here’s a pro tip: if it’s your first time decorating, practice on a scrap piece of dough to get your icing techniques down. Trust me; it’s fun and less stressful.
Themed Cookie Cutters and More
So, whether you’re prepping for a halloween party, a bake sale, or just some sweet baking adventures with the kids, these biscuits can easily be transformed into fun halloween treats! you could even make gluten-free biscuit recipes by swapping the flour, and you’d never know the difference.
Speaking of transformations, upcoming sections will include more tips on seasonal baking projects that can take your halloween cookie decorating to the next level.
Get ready for a world of spooky biscuit ideas and unique halloween desserts to delight your guests!
Professional Secrets
Oh my gosh, are you ready for some serious halloween baking fun? decorating halloween biscuits is like stepping into your own little creative wonderland, and i’m here to share a few professional secrets that’ll help elevate your spooky baking game.
Professional insights first! it’s all about using a sturdy biscuit base, like our vanilla biscuit base —trust me, no one wants a soggy biscuit.
When you mix the butter and sugar, beat them until they look light and fluffy . this incorporates air and ensures a lovely texture.
Now for some expert techniques with royal icing. use meringue powder for a firmer, more stable icing that holds its shape.
And if you’re new to decorating, try using piping bags or even plastic zip bags with a corner snipped off.
No need for fancy tools when you can just grab what’s in your kitchen!
Kitchen wisdom says to never rush through chilling your dough. this step is key! it prevents your biscuits from spreading and losing their spooky shapes.
And if you’re looking for those success guarantees , always do a test batch first. it doesn’t have to be perfect; it just gives you a feel for the process.
Perfect Presentation
Alright, let’s get to the fun part! it’s all about perfect presentation . now, when it comes to plating techniques , think of your biscuits as canvas art.
A simple white plate can make those vibrant halloween colors pop!
For those dazzling garnish ideas , sprinkle edible glitter over your biscuits once iced. it gives a sparkly, festive vibe that’s bound to impress.
And don’t be shy with serving suggestions —create a halloween dessert table with a mix of scary cookie shapes and other goodies; eye-balling some creepy candy eyes on your biscuits makes everything come alive!
If you want to jazz it up even more, consider visual appeal tips like height; stack some biscuits or add a whimsical display using themed cookie cutters.
Storage and Make-Ahead
If you’re wondering how to execute an epic halloween baking marathon, let’s chat about storage and make-ahead techniques. first off, storage guidelines are simple: keep your decorated biscuits in an airtight container.
They can last about a week —if they last that long!
Use preservation methods like parchment paper between layers to keep everything fresh and good-looking. You can even freeze unbaked biscuit dough ! Just wrap it tightly, pop it in the freezer, and when the Halloween party rolls around, bake straight from the freezer!
Now, as for reheating instructions —since you really don’t need to reheat these biscuits, just remember to enjoy ‘em fresh.
And for optimal freshness tips , keep unflavored biscuits at room temperature and iced ones in the fridge for longer shelf life.
Creative Variations
One thing i adore about baking is the endless possibilities for creative variations . if you want to change things up, why not add some zest? a lemon or orange twist in your flavored biscuit dough could make for a seriously unique halloween treat.
Dietary modifications are also easy! gluten-free biscuit recipes are super simple; just replace the all-purpose flour with a gluten-free blend.
And if you’re looking for some seasonal twists , how about pumpkin spice? it screams autumn and works beautifully with vanilla iced biscuits.
If you want to try some regional variations , think of traditional baked goods from other cultures—like speculaas for an earthy flavor!
Complete Nutrition Guide
Now, let’s dive deep into our complete nutrition guide because while treats are meant to be enjoyed, a little knowledge about what we’re munching on never hurts, right? each biscuit has around 150 calories , but the actual benefits lie in the joy we get from them—especially during festive times.
As for health benefits , consider adding nuts or seeds to the icing or dough for a fatigue-fighting crunch. it’s always good to think about dietary information , so if you’re opting for flavored varieties, the sugar content can vary (aim for balance!).
Let’s not forget about portion guidance ! try to enjoy one or two and leave the others out to share or save for that spooky dessert table.
Expert FAQ Solutions
To wrap up this spooky baking adventure, here are some expert faq solutions . common concerns often revolve around the icing: what if it doesn’t hold? well, you may need to adjust your water content! a thicker icing holds its shape better—as they say, “thicker is better.
”
Getting into the troubleshooting guide , if your dough's too sticky, lighten up on the flour next time or chill it for longer.
And for success tips , keep your spirits high—that’s half the fun! don’t be afraid to mess up a bit; after all, baking’s about the joy of creating!
So, my friend, whether you’re baking with kids or whipping up some gift basket ideas for halloween , i hope you embrace the sweetness of this seasonal baking project .
The spirit of halloween is all about community, creativity, and joy, especially when you get to decorate halloween biscuits together.
Happy baking!
Easy decorate halloween biscuits: 5 Spook-tacular Ideas for Fun Baking! Card
⚖️ Ingredients:
- 2 ½ cups all-purpose flour
- ½ teaspoon baking powder
- ½ teaspoon salt
- 1 cup unsalted butter, softened
- 1 cup granulated sugar
- 1 large egg
- 2 teaspoons vanilla extract
- 3 cups powdered sugar
- 2 tablespoons meringue powder
- 6 tablespoons water
- Food coloring (black, orange, purple, etc.)
- Edible glitter
- Sprinkles (Halloween-themed)
- Candy eyes
🥄 Instructions:
- Step 1: In a bowl, whisk together flour, baking powder, and salt.
- Step 2: In a separate bowl, beat butter and sugar until light and fluffy.
- Step 3: Add the egg and vanilla, mixing well.
- Step 4: Gradually add the dry ingredients to the wet, mixing until combined.
- Step 5: Divide the dough in half, flatten into discs, wrap in plastic, and chill for 30 minutes.
- Step 6: Preheat the oven to 350°F (175°C). On a floured surface, roll out one disc to ¼-inch thick.
- Step 7: Use cookie cutters to cut out shapes and place them on a baking sheet lined with parchment paper.
- Step 8: Bake for 10-12 minutes until the edges are lightly golden, then let cool on a wire rack.
- Step 9: In a bowl, combine powdered sugar, meringue powder, and water, then mix until smooth.
- Step 10: Divide into small bowls and tint with food coloring.
- Step 11: Transfer icing into piping bags, outline and flood the biscuits with colored icing.
- Step 12: Add sprinkles, edible glitter, and candy eyes as desired to decorate halloween biscuits.
Previous Recipe: Salad ingredient 4 6 3: 5 Easy Ways to Create a Crunchy Delight!
Next Recipe: Curried parsnip soup soup maker: 5 Easy Ways to Enjoy Comforting Goodness!