How to Cook Silverside in Oven: 5 Amazing Ways for Tender Beef!
Wondering how to cook silverside in oven? Discover our recipe for tender and flavorful braised silverside that makes a hearty family meal. Try it today!

Okay, get ready for a wee culinary adventure because today we’re diving into the world of one of my all-time favorites: oven-braised silverside.
But first, let me hit you with a question that might just tickle your brain. have you ever thought about what makes a dish truly comforting? is it the warmth of spices, the lushness of tender meat, or the joy of sharing it with loved ones? spoiler alert: with this silverside recipe, it's a delicious blend of all those things!
What makes this recipe so special, you ask? well, it’s time-consuming, but not in a scary way! you’ll need about 20 minutes for prep and then a cozy 3 hours of the meat slow-cooking in the oven.
Just picture it: you get to enjoy a delightful aroma wafting through your kitchen while you kick back with a good book or a bit of netflix.
And honestly, it’s a medium-level dish—you don’t need to be a michelin-star chef to master it. with a few tips, you'll have the kind of tender beef that would make any sunday roast proud.
Now, let's chat about the good stuff—how this recipe reached our dinner tables through the ages. silverside beef is a cut that harkens back to ways of old, and it’s been indulged in many cultures, especially in hearty british fare.
It’s traditionally found in family dinners, often served with various root veggies and a rich gravy to lay down some flavor oomph.
This slow-cooked beauty has captured the hearts of many, making it a comfort food staple that refuses to fade away.
Plus, there's something so satisfying about turning a simple cut of meat into a feast fit for a king (or an everyday hero).
Now, what sets this oven-braised silverside apart? for starters, the flavor combinations are just delightful. the juxtaposition of garlic and onion with those fragrant herbs warms your soul while you slice into that juicy roast.
And can we talk about the searing technique? it’s everything! just the sound of meat hitting a hot pan is music to my ears.
You’ll find that it’s not just about cooking; it’s participating in an age-old tradition. the dutch oven becomes your best friend here, making sure every slice is a story waiting to be savored.
Let’s not forget about nutrition! this beef cut packs a protein punch while keeping carbs low, which means you can enjoy it without a heap of guilt.
If you're counting your calories, you’ll find that with all those tender and flavorful bites, you're still staying on track.
Bonus points for including some root vegetables if you’re feeling adventurous!
Okay, before we dive into the nitty-gritty of the ingredient list, here’s a quick recap of the essentials:
- Total preparation time: About 3 hours 20 minutes, with 20 minutes of active work and 3 hours of lovely slow cooking.
- Skill level: Medium—fancy yourself a home chef? You got this!
- Serving size: Feeds about 6 hungry folks, or perhaps a smaller family with plenty of leftovers (which I’ll talk more about shortly).
- Cost efficiency: It’s a hearty, budget-friendly option that sings in abundance!
So, are you ready to get those pots and pans out and start cooking? in the next section, we’ll explore the finest ingredients for our silverside beef dish—think olive oil, hearty broth, and the kind of fresh herbs that will make your kitchen smell divine.
Let’s chat about what you’ll need to create this deliciousness!
Quality Ingredients Breakdown
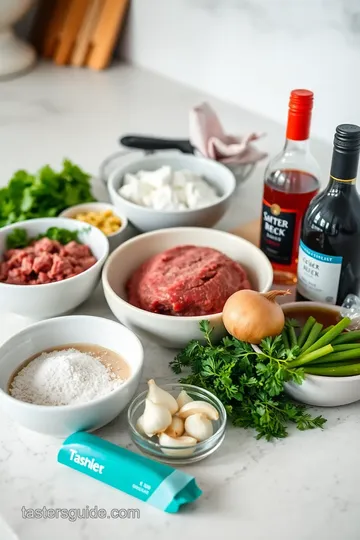
When it comes to an oven-braised silverside , the quality of your ingredients can make or break the dish. let's dive into the essentials you’ll need to gather so that your slow-cooked silverside is as mouthwatering as it sounds.
Premium Core Ingredients
First things first, the silverside beef . i usually pick a chunk weighing between 2.5 to 3 pounds. you want something that’s nicely marbled, which is basically the fat running through the meat.
This marbling keeps it tender, and trust me, when it’s done, it’ll pull apart like a dream.
-
Measurements : get your scales ready! you’ll need around 2.5 pounds of silverside. don’t skimp on the garlic either—four cloves are perfect! and don’t forget, a good couple of onions adds some natural sweetness to the braising.
-
Quality indicators : Freshness matters. The meat should look bright and have a clean smell, not funky. The fat should be creamy white, not yellowish.
-
Selection tips : If you can, buy it from a local butcher. They usually know their stuff and can help you find the best cut. Just ask them for the freshest silverside!
-
Storage guidance : if you’re not cooking it right away, wrap it tightly in plastic and refrigerate for no more than a couple of days.
You can also freeze it for up to three months, though i recommend using it fresh if you can.
Signature Seasoning Blend
Next up, let’s chat about the spices. The signature seasoning blend kicks this dish up a notch. Here’s what I like to use:
-
Spice combinations : a simple mix of salt and black pepper is essential. it’s straight to the point, but it works! don’t forget the bay leaves and some fresh thyme.
They’re aromatic and just perfect for creating that robust flavor.
-
Herb selections : Apart from thyme, you can play around with rosemary or even a touch of oregano if you fancy.
-
Flavor enhancers : Tomato paste is my go-to. Just a couple of tablespoons amps up the flavors beautifully.
-
Aromatic additions : Honestly, you can never go wrong with loads of garlic. There’s something about garlic and onion in beef recipes that transforms it into comfort food magic.
Smart Substitutions
Now, if you’re looking to switch things up, let’s explore some smart substitutions .
-
Alternative options : Not a fan of red wine? You can easily use some beef broth instead or even apple cider vinegar for a hint of acidity.
-
Dietary swaps : For those who might want a leaner option, swapping out the beef for a plant-based protein could work well, though I think it’s a whole different ball game.
-
Emergency replacements : No thyme on hand? Go ahead and use dried Italian herbs—whatever your pantry has to offer!
-
Seasonal variations : During the fall, adding root vegetables like carrots and parsnips to the braising mix is not just easy, but it makes a hearty dish.
Kitchen Equipment Essentials
Now that we’ve got our ingredients, let’s turn our attention to the hardware. Here are some kitchen equipment essentials you can’t forget:
-
Must-have tools : You’ll need a Dutch oven or a heavy oven-safe pot to keep everything together. I swear by my cast-iron Dutch oven; it’s perfect for the searing and braising method.
-
Recommended appliances : If you’re into tech, a slow cooker can also do wonders for your braising needs, but nothing feels as comforting as using the oven.
-
Helpful gadgets : A sharp knife and a sturdy cutting board are key for prepping your ingredients.
-
Home alternatives : Don’t have a Dutch oven? Any heavy pot with a lid will work too!
Pro Ingredient Tips
Lastly, here’s a little nugget of wisdom I picked up along the way:
-
Selection secrets : Always go for grass-fed beef if you can. It’s often more flavorful and packedWith good-for-you nutrients.
-
Quality markers : Look for a consistent color in the meat without any dark spots. That’s your ticket to quality.
-
Storage solutions : Vacuum-sealed bags can extend the shelf life of your meat—great for bulk buys!
-
Money-saving tips : Don't hesitate to ask your butcher for any deals on larger cuts or even less popular cuts, which can be just as delicious when cooked right.
Now that we’ve set up your ingredients checklist, let’s journey into the next step—cooking up your oven-braised silverside ! with all these rich flavors and that inviting aroma wafting through your kitchen, it's bound to turn your family dinner into a celebration.
Keep those serving suggestions at hand, because you’re going to want to showcase this beauty properly!
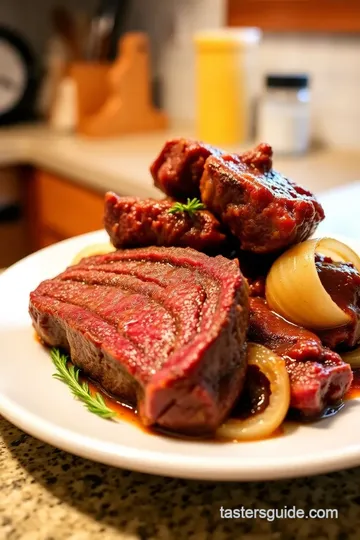
Oven-Braised Silverside: Tender and Flavorful
Oh my gosh, let me tell you about this incredible dish i just whipped up! if you've ever wondered how to cook silverside in the oven and make it tender enough to melt in your mouth, you’ve come to the right place.
This oven-braised silverside, infused with aromatic herbs and spices, is comfort food at its finest. it's the perfect dish for a cozy family dinner or when you just want to impress someone special.
Essential Preparation Steps
First things first, let’s talk about getting everything in order – or what the pros call mise en place . for this recipe, you’ll need to gather your ingredients and equipment ahead of time.
Imagine you’re a chef in a fancy kitchen but on a budget at home, and you just want to make a hearty beef dish.
For our silverside, you've got:
- Around 2.5 to 3 pounds of trimmed beef,
- Olive oil,
- A couple of onion and garlic cloves,
- A splash of red wine (if you're feeling fancy),
- Your trusty spices – think salt, pepper, thyme, and bay leaves.
Grab your dutch oven because it’s going to be your best buddy in this process. and don't forget to set aside about 20 minutes for prep.
You'll want to pat the silverside dry, rub it down with oil, salt, and pepper – seriously, don't skimp on this part!
Professional Cooking Method
Now, once your oven hits 300°f (150°c), you can move on to the fun part – searing the meat! heat the dutch oven over medium-high heat until it’s nice and hot, then sear the silverside for about 4-5 minutes on each side.
This locks in those juicy flavors that make you feel all warm and fuzzy inside.
After searing, remove the beef (but don’t clean the pot yet!) and toss in your chopped onions. sauté them until they're soft, about 4-5 minutes, then add the minced garlic for that fantastic aroma.
It’s like a blanket of comfort wafting through your kitchen.
Then comes the fun deglazing part! pour in that red wine and scrape the bottom of the pot. honestly, all those little brown bits are flavor gold! stir in your beef broth, tomato paste, and herbs, bringing it to a gentle simmer before returning the seared silverside.
Now, it’s time to braise that beauty! cover it up and slide it into the oven for 2.5 to 3 hours.
You can go do a little dance or binge-watch your favorite show while it cooks. just check it occasionally to ensure it’s submerged in your aromatic beef broth.
The key success indicator here? fork-tender! you’ll know it’s ready when you can pull it apart like a boss.
Expert Techniques
Let’s delve into some expert techniques, shall we? here’s a little secret: marinating your silverside overnight, if time allows, makes a world of difference in flavor.
And always remember to rest your meat after cooking; let it hang out under a cover for about 15 minutes before slicing, so those juices don’t end up on the cutting board.
Trust me, your taste buds will thank you!
Now, about thickening that sauce for serving—once your meat has done its resting, remove it and let the sauce bubble away until it thickens up beautifully.
A quick cornstarch slurry can also rescue a too-thin sauce in a jiffy!
Success Strategies
So, what if something goes a bit sideways? don’t panic, i've got your back. if your beef isn’t cooking fast enough, crank up the heat a tad, but keep an eye on it.
You want the perfect balance of tenderness and juicy goodness.
And after all that hard work, what do you serve it with? mashed potatoes are a classic, but creamy polenta or roasted veggies also pair up perfectly.
You can even put those leftovers to good use in sandwiches, trust me, they make epic beef sandwiches!
Next Steps
So there you have it! with these foolproof cooking steps, you’re all set for your own oven-braised silverside extravaganza. whether it’s a sunday feast or just a cozy night in, this dish delivers.
But wait! if you’re curious about more variations, nutritional info, or serving suggestions, keep reading for additional information that’ll elevate your beef game.
You won’t want to miss it!
Master Chef's Advice
So, let’s dive into the delightful world of oven-braised silverside . if you're anything like me, the idea of slow-cooked beef sounds like a warm hug on a chilly evening.
It’s a cut that truly shines when treated right. now, pro chefs have some nifty insights to help you make this dish a hit every time.
Professional Insights
First and foremost, your meat should be of good quality. a well-trimmed silverside will yield a tender and flavorful result.
Think of it as choosing the right canvas for your masterpiece; the better the quality, the more vibrant your dish will be!
Expert Techniques
One of the best techniques to master is the searing meat technique . browning your silverside before braising locks in those juices, creating a crust that develops tons of flavor.
So resist the urge to skip this step – it makes all the difference!
Kitchen Wisdom
Don’t shy away from using fresh herbs in your marinade. thyme, bay leaves, and a splash of red wine not only infuse your dish with stunning flavors but give it that comforting aroma we all crave.
And remember, timing is key! let it cook low and slow in your dutch oven, so everything melds together beautifully.
Success Guarantees
With these tips, you're pretty much guaranteed success. Just don’t forget to let it rest after it’s cooked. If you slice straight into it, all those delicious juices will escape, and no one wants dry beef at dinner!
Perfect Presentation
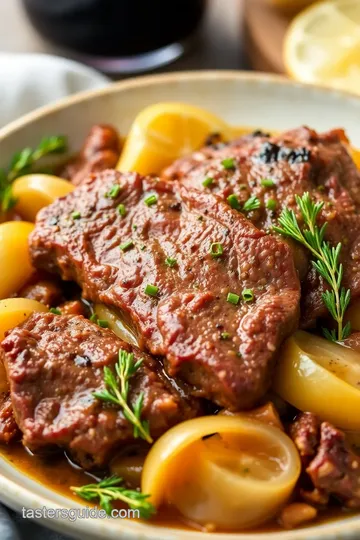
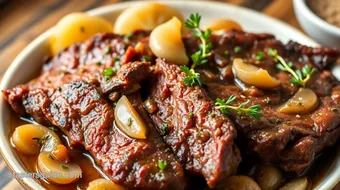
Once your silverside is cooked to perfection, it's all about the presentation.
Plating Techniques
Start by slicing the roast into even, thin pieces—you don't want it to look like it survived a battle. a good sharp knife helps here! lay them on your serving dish with a little fanning to showcase that beautiful pink center.
Garnish Ideas
Chopped fresh parsley sprinkles make everything pop with color. trust me; it’s like putting a cherry on top of a sundae.
You can also add some of those sautéed onions around the base for an elegant touch.
Serving Suggestions
Think comfort food vibes. serve this alongside creamy mashed potatoes or a hearty root vegetable mash to soak up all that delicious braising liquid.
Oh, and if you’re feeling fancy, a drizzle of that aromatic beef broth over the top can elevate the dish.
Visual Appeal Tips
Remember, we eat with our eyes first! Bright colors and contrasting textures bring your dish to life. Consider adding a side of vibrant seasonal vegetables to balance out the hearty beef.
Storage and Make-Ahead
Now, let’s talk about what to do with those leftovers because who doesn’t love a good meal prep?
Storage Guidelines
If there’s any silverside left (a big if!), let it cool down before popping it in the fridge. A sealed container is your best bet for keeping the moisture in.
Preservation Methods
You can also freeze leftover silverside. Just slice it first and wrap it tightly. It'll last for about three months in the freezer!
Reheating Instructions
When it's time to reheat, do so gently! a low heat setting on the stovetop or the oven will keep that beef tender.
Add a splash of broth or even a touch of water to keep it from drying out.
Freshness Tips
And if you're all about leftovers, consider making leftover silverside recipes like sandwiches or a hearty beef soup. Talk about versatility!
Creative Variations
Here’s where the fun begins! Let’s get a little adventurous.
Flavor Adaptations
You can easily switch up flavors using different herbs. Rosemary offers a piney touch, while oregano will throw in a Mediterranean flair.
Dietary Modifications
And don’t fret if friends or family are on special diets! You can create a herb-marinated silverside that’s lighter and still super delicious.
Seasonal Twists
In the colder months, why not add winter root vegetables like carrots or parsnips to your braising pot? They soak up the juicy flavors.
Regional Variations
If you want to kick it up a notch, try a spicy version with some crushed red pepper . It's amazing how a little heat can change the entire vibe of the dish!
Complete Nutrition Guide
Don't skip out on the health benefits, either!
Detailed Breakdown
A typical serving of this delicious silverside gives you about 30 grams of protein . That's pretty impressive for such comfort food!
Health Benefits
And let’s not forget the great nutrients in beef. Zinc, iron, and B vitamins are all part of this hearty meal. Comfort food doesn’t have to be unhealthy!
Dietary Information
Just a heads up: while this dish is delicious, it’s wise to balance it with lighter sides to keep the meal full-bodied without overloading.
Portion Guidance
When serving, think about what fits your family or friend group. Six servings are ideal, but if it’s only a few of you, save some for later because trust me, it’s even better the next day!
Expert FAQ Solutions
Got questions? I’ve got answers!
Common Concerns
“Can I cook silverside in a slow cooker?” Absolutely! Just adapt the cooking time.
Expert Answers
“How long should I cook it?” For oven cooking, about 2.5 to 3 hours is ideal for that tender outcome.
Troubleshooting Guide
If your silverside isn’t as fork-tender as you hoped, simply give it more time. The beauty of braising is that it’s pretty forgiving.
Success Tips
For a quick fix, consider a cornstarch slurry to thicken your sauce if it’s too thin. Just mix equal parts cornstarch and cold water, then stir it in while simmering.
In conclusion, cooking oven-braised silverside is not just a recipe; it’s an adventure. embrace the process, and don’t forget to enjoy every bite of that tender goodness.
Whether it’s a cozy family dinner or a get-together with friends, this dish will surely bring smiles to the table! happy cooking!
How to Cook Silverside in Oven: 5 Amazing Ways for Tender Beef! Card
⚖️ Ingredients:
- 2.5 to 3 pounds silverside beef, trimmed
- 2 tablespoons olive oil
- 1 teaspoon salt
- 1 teaspoon black pepper
- 2 onions, roughly chopped
- 4 cloves garlic, minced
- 2 cups beef broth
- 1 cup red wine (optional)
- 2 tablespoons tomato paste
- 3-4 sprigs fresh thyme or 1 teaspoon dried thyme
- 2-3 bay leaves
- Fresh parsley, chopped (for garnish)
🥄 Instructions:
- Step 1: Preheat your oven to 300°F (150°C).
- Step 2: Pat the silverside dry with paper towels. Rub the olive oil, salt, and black pepper over the meat evenly.
- Step 3: Heat a Dutch oven over medium-high heat. Sear the silverside on all sides until browned, about 4-5 minutes per side. Remove and set aside.
- Step 4: In the same pot, add the onions and cook until softened, about 4-5 minutes. Add the garlic and sauté for an additional minute until fragrant.
- Step 5: Pour in the red wine (or additional beef broth) and scrape the bottom of the pot to release browned bits.
- Step 6: Stir in beef broth, tomato paste, thyme, and bay leaves. Bring to a gentle simmer.
- Step 7: Return the seared silverside to the pot
- Step 8: Remove the silverside from the oven and let it rest, covered, for 15 minutes before slicing. Serve slices garnished with fresh parsley.
Previous Recipe: 5 Amazing Tricks for Easy Homemade Panang Curry 5 Stars
Next Recipe: Salad ingredient 4 6 3: 5 Easy Ways to Create a Crunchy Delight!