Make Crunchie Munchies: Easy Nutty Snack Bars
Discover how to make Crunchie Munchies: Easy Nutty Snack Bars! Perfect for kids and busy days, these nutritious bars are a must-try.

- look into into the Crunchy Goodness: Make Crunchie Munchies: Easy Nutty Snack Bars
- Essential Ingredients Guide: Your Go-To for Crunchie Munchies
- Mastering Professional Cooking: Your Journey to Deliciousness
- Pro Tips & Secrets to Make Crunchie Munchies: Easy Nutty Snack Bars
- Perfect Presentation: The Beauty of Your Snack Bars
- Storage & Make-Ahead Ideas: Keep It Fresh!
- Creative Variations: Flip the Script!
- Complete Nutrition Guide: All the Goodness
- Frequently Asked Questions
- Recipe Card
look into into the Crunchy Goodness: Make Crunchie Munchies: Easy Nutty Snack Bars
Oh my gosh, have you ever had one of those days when you’re just craving something crunchy and satisfying but don’t want to reach for the usual junk? yeah, me too! a couple of weekends ago, i was knee-deep in organizing my pantry when i stumbled upon a half-open bag of oats and some random nuts.
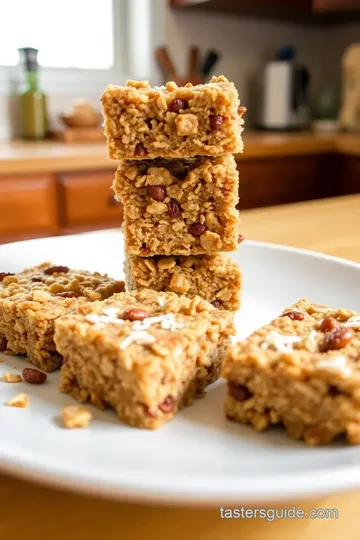
It hit me—why not whip up something fun? that’s when i decided to make crunchie munchies: easy nutty snack bars .
Trust me; they are a total game-changer for those on-the-go snack attacks!
A Taste of History: Where Do These Bars Come From?
Now, let’s chat about the backstory of these delightful nutty snack bars recipe . the idea of making snack bars is not new.
Many cultures have been blending nuts, grains, and sweeteners for ages — think of the old-school granola. however, they’ve evolved into these modern treats we see everywhere today.
These bars have shot up in popularity, mainly because everyone’s looking for healthier alternatives without sacrificing taste.
Honestly, with just 55 minutes of your day, you can make a batch that yields about 12 bars . and the best part? they’re super simple to whip up.
You don’t need to be a culinary wizard—just a mixing bowl and your favorite nut butter will do the trick.
Jumping Into Crunchy Snack Ideas: Why You’ll Love Them
So, why have these easy homemade snack bars captured my heart? first off, there are some serious health benefits packed in these babies! with whole oats, nuts, and maybe a sprinkle of dried fruit, you're getting a solid dose of nutrients.
These bars are perfect for everything—whether you’re looking for energy bars for kids , a quick breakfast on the go, or a post-workout boost, these guys have your back! they shine at special occasions too.
Picture this: a picnic with friends or a hiking trip. pull out these homemade treats, and watch everyone dive in!
Money Matters: Are They Worth It?
Now, i get it—the cost can be a concern. but here’s the scoop—making your own nut butter recipes and diy snack bars can actually save you some serious cash compared to store-bought options.
Plus, you can customize the ingredients based on what you’ve got lying around. no almond flour? no problem! just use oats or whatever nut butter you have.
No-nonsense snacking at its finest!
Why They're Better: The Key Advantages
These nutty snack bars definitely beat those overpriced protein bars you find at the store. you get to control the sugar content , so you can even make low-sugar snack bars if that’s your jam.
And let’s not forget, they can easily be adjusted to be gluten-free and vegan just by swapping out a few ingredients.
Okay, but here’s the real kicker: these bars are mega versatile ! you can add chocolate chips, dried fruits, or even seeds for a little extra crunch.
The variations are endless—you can have a different flavor adventure every time!
Let's Get to It: Ingredients Galore
If you’re feeling inspired and ready to make these munchies, just hang tight! we’re about to dive into the delicious ingredient list that’ll kick off your snacking journey.
Get your mixing bowl ready because it's time to stock up on some oats, nuts, and that favorite nut butter of yours.
Coming up next, I’ll share the specific ingredients you'll need along with how to put it all together. Let’s create some munchies that’ll have everyone asking for the recipe!
Essential Ingredients Guide: Your Go-To for Crunchie Munchies
Alright, my fellow snack lovers! if you’ve ever found yourself in the snack aisle, staring at all the healthy options, pondering what to even choose—well, i’ve got your back.
Let’s break down the essential ingredients you need for a rockstar recipe that’s bound to impress: make crunchie munchies: easy nutty snack bars ! these bars are not only tasty; they're also super satisfying and pretty dang easy to whip up.
Trust me; you’ll want to keep this guide handy!
Premium Core Components
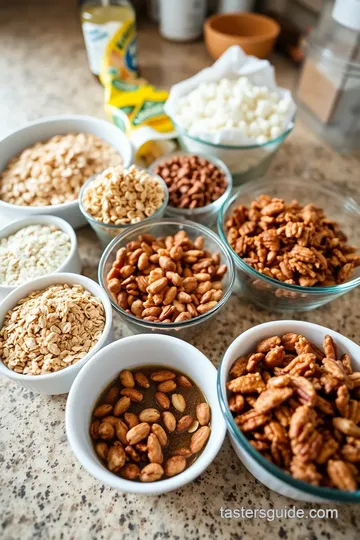
When it comes to making those Nutty Snack Bars , a few ingredients are absolute must-haves. Here are the details you need to become a kitchen pro.
- Rolled Oats: You’ll need 2 cups (200g) . They’re your crispy base and fill you up with healthy fiber.
- Mixed Nuts: Grab 1 cup (150g) of your faves: almonds, walnuts, you name it! Make sure they’re fresh —no one wants stale nuts. Give them the sniff test; if they smell funky, toss ‘em!
- Nut Butter: Use about 1/2 cup (80g) , like almond or peanut butter. This gives your bars that rich creaminess. When picking a nut butter, look for labels with few ingredients—just nuts and maybe a little salt.
Storage tip: These goodies will last in an airtight container for up to two weeks . But I doubt they’ll last that long—they’re that good!
Signature Seasoning Blend
Seasoning isn’t just for savory dishes. For your bars, a touch of flavor enhances the deliciousness.
- Vanilla Extract: Just a teaspoon adds depth. It’s like a warm hug for your taste buds.
- Salt: A touch of 1/2 tsp (2g) helps balance sweetness. Don't skip it!
Oh, and if you want to get fancy, consider adding spices like a pinch of cinnamon or nutmeg. It’ll give your bars a nice autumn flair.
Smart Substitutions
Life happens, right? You might not have everything on hand. That’s okay!
- Nut Butter Substitutes: Try sunflower seed butter if you’ve got nut allergies.
- Corn Syrup Alternative: Swap honey with agave syrup for a vegan version.
- Dried Fruits: Use what you have—raisins, cranberries, or even apricots work. Just make sure they’re chopped for even distribution.
Kitchen Equipment Essentials
Before you dive into mixing, let’s chat gear. You don’t need a fancy setup, just the essentials.
- Mixing Bowl: A big one, please! You’re mixing a lot here.
- Baking Dish: An 8x8 inch dish is ideal for bars. Line it with parchment paper for easy removal—you’ll thank yourself later!
- Spatula: For pressing the mixture down. Get a sturdy one!
Pro tip: If you have a food processor, use it to chop up those nuts quickly.
So, are you ready to get your snack on? in just a bit, we’ll dive into the steps for making these easy nutty snack bars .
Trust me; your afternoon cravings will thank you later! whip up these bars, and you’ll have a healthy food adventure right in your own kitchen.
I totally believe a good snack can boost your day, and these bars fit the bill. plus, you can jazz them up however you like—dark chocolate flakes anyone?
So grab your ingredients, your gear, and let’s make these together! it'll be way more fun than scrolling through snack options at the store, right? keep those ingredients close and get set for some seriously scrumptious snack bars filled with wholesome goodness.
You’re gonna crush it!
Mastering Professional Cooking: Your Journey to Deliciousness
Oh my gosh, have you ever thought about the secret sauce behind those perfect meals that you just can't get enough of? it's all about mastering some professional cooking methods .
Whether you're whipping up some easy homemade snack bars or a fancy dinner, knowing how to prep and organize is key to cooking success.
Grab your apron and let's dive into this!
Essential Preparation Steps
First things first, let’s talk mise en place, which is a fancy french term for “everything in its place.” imagine you're cooking up a storm but running back and forth to grab ingredients.
Total chaos! so, set up your workstation like a pro—measure out your nuts, oats, and dried fruits before you even start.
This way, you’ll keep things flowing smoothly.
Time management is everything! If you schedule a time for each part of your cooking, you’ll be surprised how much more efficiently you can whip up those nutty snack bars ! For instance, while the bars are chilling in the fridge, you could prep a salad or clean your kitchen—talk about killing two birds with one stone!
And organization is your best friend. keep your cutting board clear and have your tools handy. i personally like putting everything i need in little bowls, almost like my own cooking show.
It makes the whole process easier and way more fun.
Let’s not forget about safety! Always be cautious with sharp knives and hot surfaces. Make sure you're using oven mitts when handling hot trays that could easily burn your fingers. Safety first—always!
Step-by-Step Process
Now, let me walk you through the steps for those Easy Nutty Snack Bars . Trust me, these are a game changer for on-the-go munching!
- Prepare Your Baking Dish : Start by lining an 8x8 inch dish with parchment paper. This makes removing the bars super easy later!
- Mix Dry Ingredients : Toss your 2 cups of rolled oats and 1 cup of chopped mixed nuts in a bowl. Add 1/2 cup of dried fruit and a pinch of salt.
- Combine Wet Ingredients : In a separate bowl, mix 1/2 cup of nut butter and 1/3 cup of honey . Trust me, this sticky goodness ties everything together!
- Combine and Press : Mix the wet and dry ingredients until they're well combined. Then press the mixture into your prepared baking dish. Get messy, this part is fun!
- Bake : Preheat your oven to 350° F ( 175° C) and bake for 10 minutes . Look for those edges to turn golden brown.
- Cool & Cut : Let it cool completely before cutting into bars. This will keep them nice and sturdy instead of crumbly.
Expert Techniques
Want to take your cooking to the next level? let's talk about some expert techniques . toasting your nuts before mixing them into the bars can add incredible flavor.
Also, be sure to press the mixture down firmly; if your bars crumble, it’s no good!
Quality checkpoints are crucial. keeping an eye on the internal temperature of nut butter melts can save you from a burnt mess.
A small trick: if it smells great in the oven, you’re on the right track!
Success Strategies
Now, let's wrap this up with some success strategies to ensure your bars turn out perfect every time. One of the common mistakes I’ve made is not letting the bars cool completely—what a disaster!
When it comes to quality assurance, taste a few of the ingredients before mixing. You want to be sure everything is fresh and flavorful.
Finally, don’t stress if you have time constraints! these bars are fantastic as make-ahead options . just pop them in the fridge, and you’re set for the week with nutty afternoon snacks that are healthy and easy to grab.
Additional Information
Alright folks, there you have it—your complete guide on pro cooking methods. the next time you whip up a batch of make crunchie munchies: easy nutty snack bars, you’ll feel like a chef in your own kitchen.
So, go experiment with those nut butter recipes and enjoy the wholesome results! happy cooking!
Pro Tips & Secrets to Make Crunchie Munchies: Easy Nutty Snack Bars
Alright, let’s dive into the nitty-gritty of make crunchie munchies: easy nutty snack bars . i've whipped these up a million times, and i've got some juicy insider tips for you.
When you’re making these nutty snack bars , don’t rush it! here are my pro tips.
Flavor Enhancement Tips
Get creative! one of my favorite tricks is to toast the nuts before mixing them in. just toss them in a dry pan on medium heat for a few minutes until they’re fragrant.
It elevates those flavors and adds a killer depth. also, consider adding a dash of cinnamon or nutmeg for a warm, cozy vibe.
Isn’t it amazing how simple spices can make a world of difference?
Time-Saving Techniques
Pressed for time? you can mix your dry ingredients days in advance. just store them in an airtight container. when you're ready to whip these up, just combine the wet and dry ingredients, and voilà! dinner just turned into a speed-demon of a meal prep session.
Perfect Presentation: The Beauty of Your Snack Bars
Let's face it. Who doesn't love a snack that looks as good as it tastes?
Plating Techniques
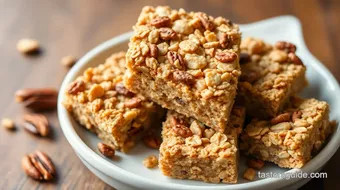
When you cut your bars, try to make them into uniform pieces. it's like a mini victory when they look like they were crafted by a pro.
You can use a sharp knife or even a pizza cutter for straight lines – less mess and more finesse!
Garnish Ideas
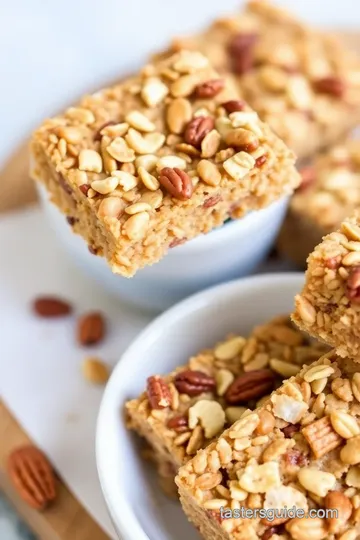
A sprinkle of sea salt on top before you bake can add a burst of flavor. drizzling melted dark chocolate over the cooled bars? that’s a total chef’s kiss moment.
You can also chop up some dried fruits or nuts and sprinkle them on top for that extra flair.
Storage & Make-Ahead Ideas: Keep It Fresh!
You’ll want these bars to last. Here’s the scoop:
Storage Guidelines
Store your bars in an airtight container at room temperature. They’ll stay fresh for about a week, but trust me, they likely won’t stick around that long!
Reheating Instructions
If you want to enjoy your bars warmed up, just pop them in the microwave for about 10-15 seconds . this brings back some chewiness and makes the nut butter all melty and delicious.
Creative Variations: Flip the Script!
Once you master the basics, it’s time to experiment.
Flavor Adaptations
Want a chocolate fix? Add cocoa powder or chocolate chips into the mix. Or, how about a tropical spin with dried pineapple or coconut flakes? The possibilities are endless!
Dietary Modifications
Got dietary needs? easy! go for vegan alternatives by using plant-based nut butter and agave syrup. want it gluten-free? just choose certified gluten-free oats.
It’s all about customizing to what works for you.
Complete Nutrition Guide: All the Goodness
Let’s break down what you’re snacking on.
Health Benefits
These easy homemade snack bars are a powerhouse! you’ve got plenty of protein from the nuts and seeds, fiber from the oats, and natural sweetness that won’t spike your sugar levels.
Perfect for energy bars for kids and adults alike!
Portion Guidance
Stick to one bar for a quick energy boost during your busy day. they are filling, for sure! if you find one is not enough, pair it with a piece of fruit for a more satisfying snack.
Wrapping It Up
There you have it! with these tips and tricks, you’re ready to make the best nutty afternoon snacks around. remember, cooking is just like life – it’s all about experimenting, having fun, and sharing with others.
So, go grab some ingredients, channel your inner chef, and start making those crunchy, tasty nut bars that everyone will love.
You’ve got this!
Frequently Asked Questions
What ingredients do I need to Make Crunchie Munchies: Easy Nutty Snack Bars?
To make Crunchie Munchies, you'll need rolled oats, mixed nuts (like almonds or walnuts), a nut butter of your choice, honey or maple syrup, dried fruit, vanilla extract, and a pinch of salt. These ingredients blend together to create a deliciously nutty and satisfying snack bar.
Can I customize the ingredients in the Crunchie Munchies recipe?
Absolutely! You can customize your Crunchie Munchies by using different nuts, adding chocolate chips, or incorporating seeds like chia or flaxseed. Feel free to experiment with spices, such as cinnamon or nutmeg, to create unique flavors tailored to your taste.
How should I store my Crunchie Munchies snack bars?
Store your Crunchie Munchies in an airtight container at room temperature for up to a week. For longer storage, you can refrigerate them for up to two weeks or freeze for up to three months to maintain freshness.
What is the best way to ensure my Crunchie Munchies don't crumble?
To prevent your snack bars from crumbling, ensure you press the mixture firmly into the baking dish before baking. Allowing them to cool completely before cutting will also help them hold their shape, giving you nice, clean bars.
Are Crunchie Munchies a healthy snack option?
Yes! Crunchie Munchies are a healthier snack choice filled with wholesome ingredients like nuts, oats, and dried fruit. They provide a good source of protein, healthy fats, and fiber, making them a nutritious pick-me-up for any time of day.
Can I make these nut bars vegan?
Yes, you can easily make Crunchie Munchies vegan by substituting honey with maple syrup or agave syrup. Additionally, choose a plant-based nut butter, and you’ll have a delicious vegan snack that's just as satisfying!
Make Crunchie Munchies: Easy Nutty Snack Bars Card
⚖️ Ingredients:
- 2 cups rolled oats
- 1 cup mixed nuts, chopped
- 1/2 cup nut butter
- 1/3 cup honey or maple syrup
- 1/2 cup dried fruit, chopped
- 1 tsp vanilla extract
- 1/2 tsp salt
🥄 Instructions:
- Step 1: Line the baking dish with parchment paper, leaving an overhang for easy removal.
- Step 2: In a large mixing bowl, combine rolled oats, chopped nuts, dried fruit, and salt.
- Step 3: In a separate bowl, mix nut butter, honey (or maple syrup), and vanilla extract until smooth.
- Step 4: Pour the wet mixture over the dry ingredients, mixing until evenly coated.
- Step 5: Transfer the mixture to the lined baking dish, pressing down firmly and evenly with a spatula.
- Step 6: Preheat the oven to 350°F (175°C) and bake for about 10 minutes or until lightly golden around the edges.
- Step 7: Allow to cool completely in the dish before lifting out with parchment paper, then cut into bars.
Previous Recipe: Easy & Juicy Crispy Lemon Chicken Cutlets with Zesty Sauce: A Family Favorite!
Next Recipe: Polish Cheese Babka: A Family Favorite with Baking Tips